DevContainers Introduction: The Ideal Standardized Team Development Environment — Part 1/3
Over time, any application environment can become unstable due to conflicting dependencies, configuration changes, and residual files. Container technologies are well-known for solving the aforementioned problems in production environments, but can also effectively solve these problems for local development environments.
A local development environment can run entirely within a container, referred to as a DevContainer. This solution offers an isolated setup equipped with all necessary tools and dependencies. If the environment becomes faulty, simply rebuilding the DevContainer restores it to its original state. New team members can quickly access a pre-configured setup, reducing onboarding time and avoiding the usual setup hassle.
While this example focuses on VSCode, DevContainers can also be used in other IDEs like JetBrains.
Setting up a VSCode DevContainer
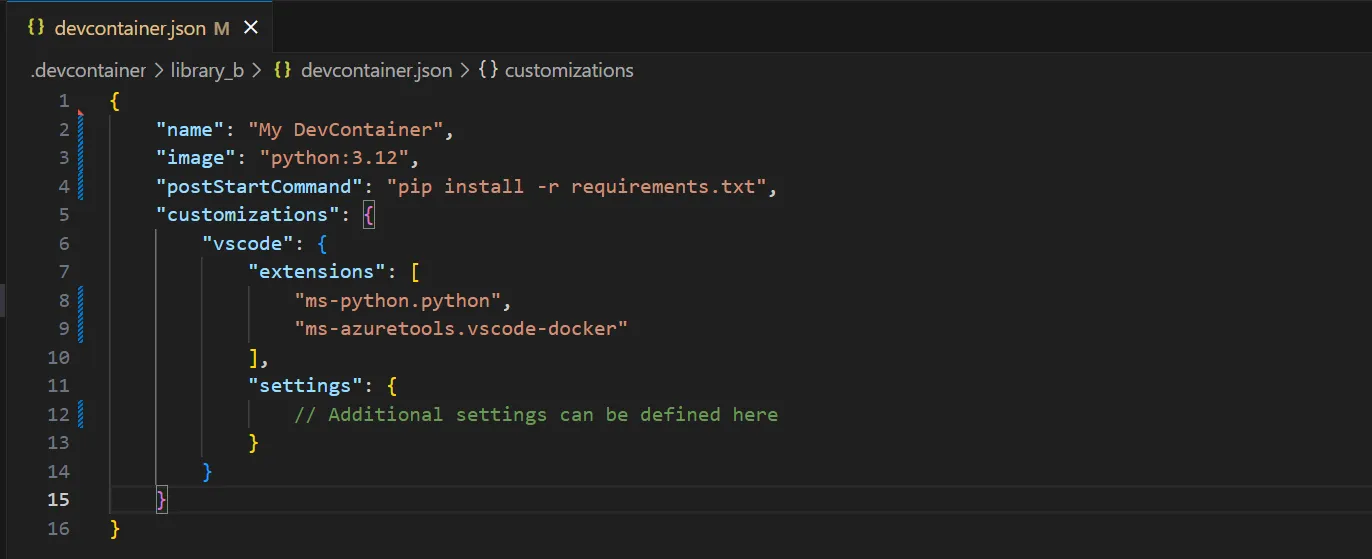
Install the ‘Dev Containers’ extension in VSCode or from the VSCode Marketplace . At the root of the project folder, create a .devcontainer directory. Inside this directory create a devcontainer.json file, it defines the environment, dependencies, and any required extensions.
Below is a minimal example of a devcontainer.json configuration. It uses the pre-built python:3.12 container image, which includes common Python tools like Pip and Poetry. After the container is built, required dependencies are installed using pip, and the VSCode extensions for Python and Docker are enabled automatically.
1
2
3
4
5
6
7
8
9
10
11
12
13
14
15
16

{
    "name": "My DevContainer",
    "image": "python:3.12",
    "postStartCommand": "pip install -r requirements.txt",
    "customizations": {
        "vscode": {
            "extensions": [
                "ms-python.python",
                "ms-azuretools.vscode-docker"
            ],
            "settings": {
                // Additional settings can be defined here
            }
        }
    }
}
Once the file is in place, press F1 or open the command palette and search for Dev Containers: Build Container. This command will rebuild and reopen VSCode inside the containerized environment. After the container is created, it can be easily reopened at any time by selecting Dev Containers: Reopen in Container from the command palette.
If the environment becomes unstable or requires a fresh start, the entire DevContainer can be rebuilt using the Dev Containers: Rebuild Container command, restoring the environment to its original state.
Use a Custom Dockerfile to customise the Development Environment
While pre-configured images provide a strong foundation, a custom Dockerfile allow teams to structurally add necessary components to the development environment, e.g. installing additional software, setting environment variables, and changing configurations.
When containers are already used in production works, creating a custom Dockerfile for the DevContainers could help keep the development and production environments similar. This consistency reduces issues when moving code from development to production. A shared Dockerfile also encourages team collaboration on tools and dependencies, making the setup more efficient and streamlined. For example, integrating OpenJDK into the container would be valuable when working with PySpark.
1
2
3
4
5
6
7
8

# Use the official Python 3.12 base image
FROM python:3.12

# Install OpenJDK for Spark
RUN apt-get update && apt-get install -y openjdk-11-jdk && apt-get clean

# Set the working directory
WORKDIR /app
Lifecycle scripts on container create and start
DevContainers support lifecycle hooks such as postCreateCommand and postStartCommand, which allow for automation and customization at different stages of the container’s lifecycle. These hooks customise the setup process and automate routine tasks.
The postStartCommand runs every time the container starts, making it ideal for managing dependencies. For example, by adding pip install -r requirements.txt to this command, you can ensure that all required packages are installed and up to date every time the container is restarted. In contrast, the postCreateCommand runs only once, right after the container is created, making it perfect for one-time setup tasks that don’t need to be repeated on each startup.
For more complex setups, whole shell scripts can be used. Add a shell script with your commands to the repository and trigger it by using bash /path/to/script.sh in one of the lifecycle hooks.
Add external services to the DevContainer
Supporting containers can be added to a devcontainer using Docker Compose, which allows for a more integrated development environment. This setup allows for the orchestration of additional services like Azurite for mock Azure storage or Spark for data processing. Including these services ensures that all necessary components are available for local development, allowing for thorough testing and integration with the application’s dependencies.
1
2
3
4
5
6
7
8
9
10
11
12
13
14
15
16
17
18
19
20
21
22

version: '3.8'

services:
  web:
    build:
      context: .
      dockerfile: Dockerfile
    volumes:
      - ../:/workspace:cached
    ports:
      - "8000:8000"
  azurite:
    image: azurite
    ports:
      - "10000:10000"
      - "10001:10001"
  spark:
    image: bitnami/spark:latest
    environment:
      - SPARK_MODE=master
    ports:
      - "8080:8080"
1
2
3
4
5
6
7
8
9
10
11
12
13
14
15
16
17

{
    "name": "My DevContainer",
    "dockerComposeFile": ["./docker-compose.yml"],
    "service": "app",
    "workspaceFolder": "/workspace/library_b",
    "customizations": {
        "vscode": {
            "extensions": [
                "ms-python.python",
                "ms-azuretools.vscode-docker"
            ],
            "settings": {
                // Additional settings can be defined here
            }
        }
    }
}
Even if custom images or additional services aren’t needed right now, it’s advantageous to adopt this workflow early. It keeps things flexible, allowing for easy adjustments later without disrupting the team’s process.
Mono-repo structure for DevContainers
In a mono-repo setup, each product may have different configurations, dependencies, and tools that necessitate distinct DevContainers. Multiple devcontainers can be easily added to a repository by creating subfolders with its own devcontainer.json, now when opening or building a devcontainer it prompts which one.
The challenge, however, lies in configuring it so that only the relevant product folder is opened. Without further configuration, it will simply open the entire repository which is a rather cluttered experience to work in. Although there is official documentation on configuring DevContainers for a mono-repo, I could not get it to work.
A straightforward approach is to specify the product folder in the docker-compose volume, e.g. ../hello_world:/workspace:cached. However, the advantage of a mono-repo lies in the ability to access multiple products within the same repository. Therefore, it’s essential that the entire repository is available inside the container. This can be achieved with a simple change: setting the DevContainer’s workspace to the specific product subfolder. While the entire repository is still mounted via Docker Compose, the devcontainer.json is configured to set the working directory to the desired subfolder. In the devcontainer.json instead of image now refer to a dockerComposeFile.
Additionally we set Git to search for open repositories in the parent folder, as well as use gitignore files in the parent folder.
1
2
3
4
5
6
7
8
9
10
11

"workspaceFolder": "/workspace/hello_world",
"dockerComposeFile": ["./docker-compose.yml"],
"service": "app",
...
"customizations": {
        "vscode": {
            "settings": {
                 "git.openRepositoryInParentFolders": "always",
                 "search.useIgnoreFiles": true,
                 "search.useParentIgnoreFiles": true,
            }
To reference other root folders for configuration, simply navigate up one folder using ../. For example, reference a configuration as such:
1

"ruff.format.args": ["--config=${workspaceFolder}/../path/to/ruff.toml"],
Fully configured DevContainer: check out my Github
For a fully set-up DevContainer that includes code quality tools, visit my GitHub at github.com/KrijnvanderBurg/DevOps-Toolkit .
It’s a straightforward example to clone and tweak to fit your project. This setup streamlines your workflow by integrating essential tools directly into the container, avoiding manual setup and creates a consistent environment for the entire team.